
30 Gorgeous Tile-Next-to-Wood Kitchen Flooring Ideas You Must See
When designing your kitchen, the transition between tile and wood flooring can add both style and functionality to the space. The combination of wood flooring and tile flooring provides a perfect balance between the warmth and texture of wood and the durability and ease of maintenance of tile. Whether you’re creating a seamless flow from the kitchen into other parts of your home or defining specific areas like the cooking zone or dining area, the right combination of tile and wood can elevate your kitchen’s design. In this article, we’ll explore 7 creative kitchen flooring ideas that combine tile next to wood flooring, offering you the best of both worlds.
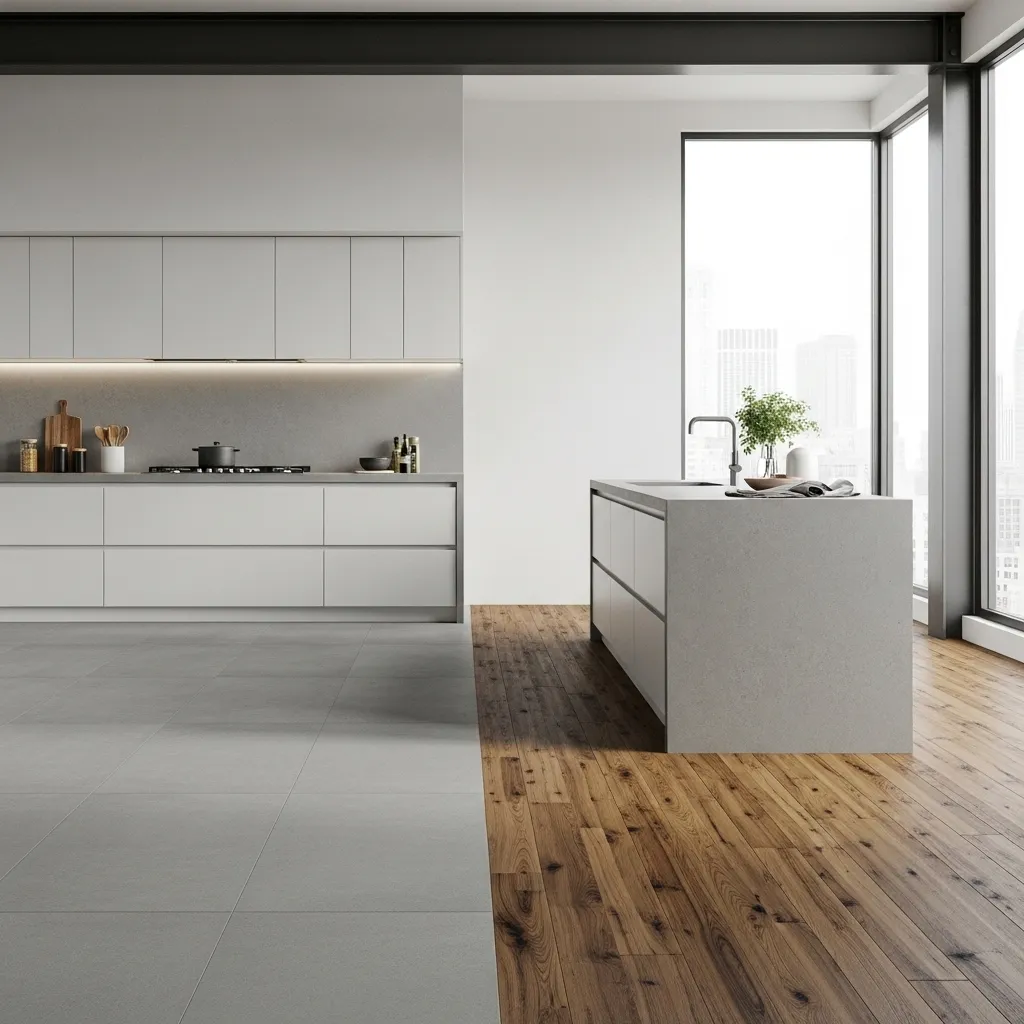
1. Wood Flooring in the Main Area, Tile Near the Cooking Zone

Design Tip: A practical and stylish option is to install wood flooring in the main areas of your kitchen, such as the dining and living zones, while placing tile near the cooking and prep areas (e.g., around the stove, sink, or dishwasher). This allows you to enjoy the warmth and beauty of wood in spaces where you entertain and relax, while the tile provides durability and ease of cleaning in areas prone to spills and moisture.
Why It Works: Wood floors offer natural beauty, creating an inviting and cozy atmosphere, while tile is more resistant to moisture and stains, making it perfect for areas that experience heavy foot traffic and spills. This combination provides a functional and aesthetic balance, ensuring your kitchen remains both stylish and easy to maintain.
Styling Tip: Choose a neutral tile like gray or beige to complement the rich tones of your wood flooring. You can create a smooth transition between the two by using matching grout or a transition strip that matches the wood’s color.
2. Herringbone Tile Pattern Alongside Wood Flooring

Design Tip: A herringbone tile pattern placed next to wood flooring can create a striking visual contrast and an elegant transition between materials. This pattern adds texture and a dynamic flow to your kitchen, giving it a modern and sophisticated look.
Why It Works: The geometric shape of herringbone tiles juxtaposes beautifully with the organic lines of wood, creating a perfect balance between modern design and traditional charm. This combination works well in larger kitchens or open-plan spaces, providing a stylish way to define areas within the kitchen.
Styling Tip: Consider using white or gray tiles in a herringbone pattern to create a soft contrast with the warmth of wood. The pattern’s sharp lines and angles will enhance the room’s layout, creating a clean and structured look while maintaining the coziness of wood.
3. Mixing Porcelain Tile with Hardwood for a Contemporary Look
Design Tip: For a modern, industrial look, combine porcelain tiles with hardwood. Porcelain tiles, with their versatile designs and durability, pair well with wood flooring, especially in kitchens that have an open concept or are designed with a minimalist style.
Why It Works: Porcelain tiles come in a wide variety of styles, including those that mimic the look of natural stone or concrete. When paired with wood, porcelain adds sleekness and durability, while the wood softens the hard lines of the tile. This pairing can also help balance warm and cool tones in your kitchen design.
Styling Tip: Choose a dark porcelain tile for a bold contrast against light or medium-tone wood floors. Or, go for light-colored porcelain to complement darker wood tones. This mix gives you a perfect blend of warmth and modernity, ideal for contemporary kitchens.
4. Define the Island Area with Tile and Wood Surrounding

Design Tip: Use tile beneath the kitchen island to define it as a focal point and separate it visually from the rest of the kitchen. Surround the rest of the kitchen with wood flooring to maintain warmth and continuity throughout the space.
Why It Works: The tile underneath the island can act as both a practical surface that’s easy to clean and an attractive design feature that sets the island apart. This design also adds dimension to the kitchen, creating defined zones within the space without the need for physical partitions.
Styling Tip: Choose tile that contrasts with the wood, like ceramic or stone tiles in a pattern or solid color. The island area can be decorated with larger or darker tiles, while the rest of the kitchen maintains a lighter, more consistent wood floor.
5. Transition Strips for Seamless Flooring Flow
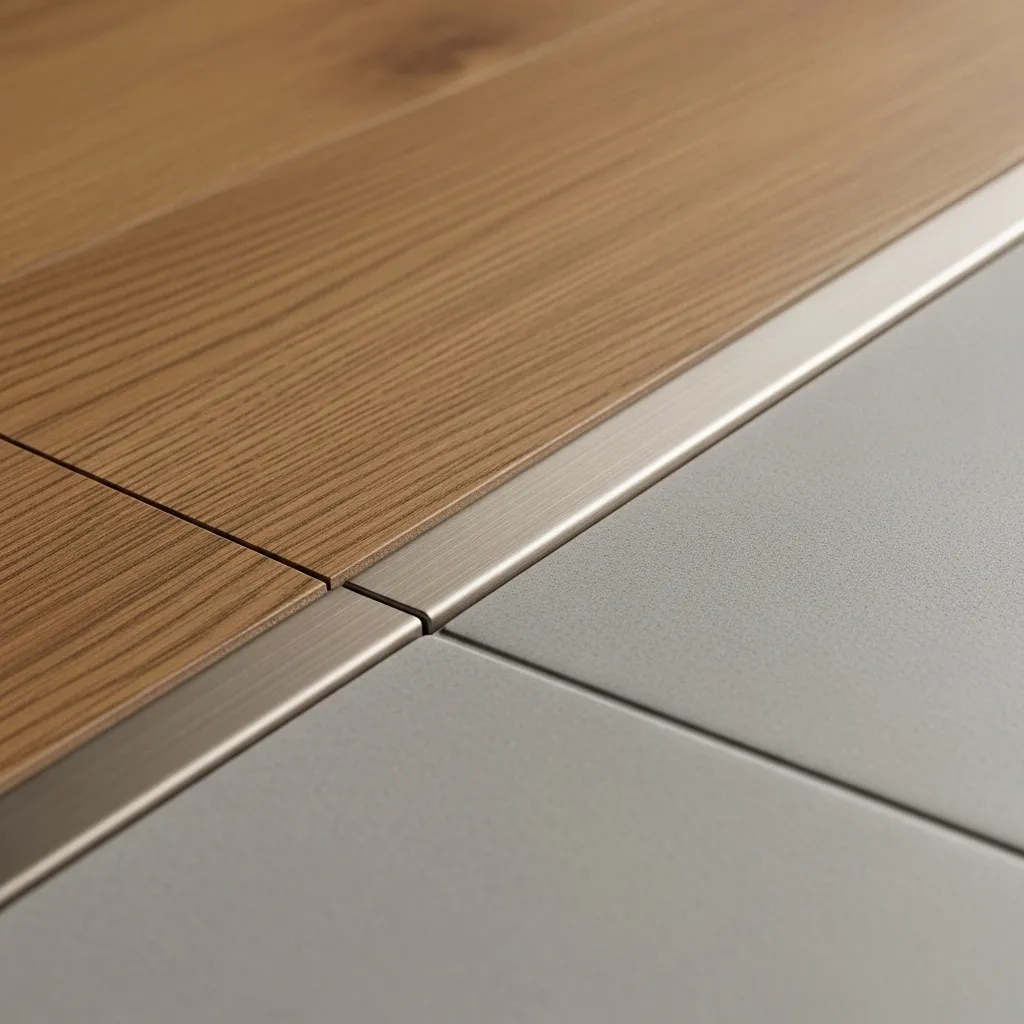
Design Tip: If you want a smooth, professional transition between wood and tile flooring, consider using transition strips. These strips bridge the gap between the two materials, providing a seamless and polished finish.
Why It Works: Transition strips allow you to join two different types of flooring without an abrupt visual break. They also help prevent tripping hazards by providing a smooth edge between the floors. This design detail ensures that the two materials flow together naturally.
Styling Tip: Choose transition strips that match either the wood or tile color to make the joint less noticeable, or opt for contrasting strips to make the transition a deliberate design feature. For a cohesive look, use metal transition strips that complement both materials.
6. Create Zones with Different Colors and Textures

Design Tip: Use tile in specific kitchen zones, such as the cooking or prep area, and wood for the rest of the space to create distinct areas within your kitchen. You can achieve this by using different colors or textures of tile next to wood flooring to define functional zones without walls.
Why It Works: Creating visual zones in the kitchen using different flooring types can enhance the functionality of each space. The wood flooring adds warmth to the dining and living areas, while the tile in work zones like near the stove or sink is easy to clean and durable. This division adds depth and organization to an open layout.
Styling Tip: Use bold, patterned tiles in the cooking area for a striking contrast with plain wood flooring. Alternatively, use subtle textured tiles to complement the wood without overwhelming the space. You can also use tile in a specific color or pattern to subtly draw attention to key areas.
7. Diagonal Tile Placement Next to Straight-Lay Wood Flooring

Design Tip: To add visual interest, try using diagonal tile placement next to straight-lay wood flooring. The contrast between the tile’s diagonal lines and the straight edges of the wood creates dynamic flow and helps define the space.
Why It Works: Diagonal tiles are more visually engaging compared to traditional straight-lay tiles, and when placed next to the clean lines of wood flooring, they create a striking contrast. This design works well for kitchens with a modern, geometric aesthetic.
Styling Tip: Choose neutral-colored tiles, like gray or white, for the diagonal pattern to keep the look balanced. Use natural wood floors in straight-lay patterns to maintain a sense of continuity and allow the tile layout to stand out.
Conclusion
Combining tile and wood flooring in your kitchen offers a beautiful way to blend warmth, durability, and design flexibility. Whether you’re defining specific areas with contrasting materials or using subtle transition strips for a smooth flow, these ideas can help create a balanced, stylish, and functional kitchen. With the right tile and wood combination, you can design a kitchen that’s both visually appealing and highly practical.